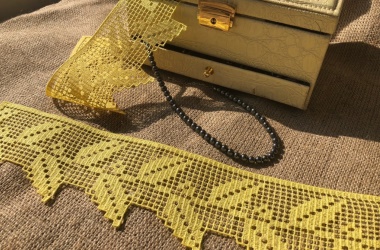
I’m going to show you an awesome technique for embroidery called freestanding lace. Instead of being done on fabric this embroidery is done on washer a stabilizer. So when you remove the stabilizer the lace stands on its own.
You can use this incredibly versatile technique in so many ways.

I’ve used it to embellish clothing by putting it over shirts turning it into collars, laces, decorating cuffs and even shoes.
You can even make jewelry and accessories, Christmas ornaments doilies and other delicate intricate designs.
The best part is very simple to create you just need the right tools for the job.
What you need for FSL embroidering
I have no favorite threads to use for this technique. I’ve used both polyester or rayon thread. Somebody prefer polyester threads. It’s a super fine thread that makes an ideal choice for really intricate or small designs allowing you to get all the details in the design. Embroidery polyester thread will make very fine web-like lace.
Embroidery rayon thread is too soft, it does not keep its shape and often its color will fade under the influence of chemicals from the water-soluble mesh. But I like it at linen projects.

You can also make thread lace with cotton which is a good choice when you want a piece with a matte finish. The thinner the thread, the finer the final product will be. That is why for FSL I recommend machine quilting cotton thread, which gives bulk to the lace and makes it look hand-made. I’ve used cotton thread when I want the natural cotton look on a piece of clothing.

You want to wind a bobbin with the same thread you’re using in the top this is because freestanding lace is visible from both sides.
You’ll also need a water soluble stabilizer. There are two different kinds in the market.

Now what I prefer using looks a little more like fabric. I recommend to use water-soluble mesh, such as Vilene. Vilene D0102 is a non-woven dissolvable stabilizer which is imported into the US, is sold in large rolls and is sometimes packaged under different brand names. Some of these brand names are Fabri-Solvy by Sulky, Avalon Plus by Madeira, Wash-Away, and Aqua Magic.
The other kind has a plastic appearance and I find it doesn’t function as well for this technique. Film-like water soluble stabilizers, such as Solvy by Sulky, Avalon by Madeira and Badge Master are not recommended for Free-Standing Lace embroidery. If you have a lot of it, you can use film-like water soluble stabilizer as a second (up) layer in the hoop.
Great if you have a special foot “Q” for the embroidery machine.

Finally you’ll want your embroidery machine and FSL-design. Choose a design that’s made for freestanding laces which will have a lot of connections throughout that will hold it together.
How to stitch
Let’s going to start by placing the spool of thread on a thread stand called the thread tamer.
Place your stabilizer in the embroidery hoop, making sure that it is tight and flat.

Attach the embroidery foot “Q” if you have it.
Next place your embroidery hoop in your machine. Making sure it is securely attached.

And now we’re ready to begin start the machine. I use two layers of water soluble mesh. First I stitch the second layer with an extra frame.


Then pause after a few stitches to snip away your starting thread so it doesn’t get caught up in your design. Now restart your machine and watch it for the first little while to make sure it is running smoothly.
Your machine will stop by itself when the design is complete. Look how perfectly that stitched out. We didn’t have a single thread breakage the entire time.
I’m going to pull this out of the embroidery hoop and trim away the excess stabilizer.


Take a plastic lunch mat and pin your embroidery item carefully.


The only thing left is to toss it in a bowl of warm water to melt the rest away.

Gently massaged the lace to get all the stabilizer out of the small crevices.

When all the stabilizer is gone, allow your free-standing lace to air dry.


Once completely dry pull out all pins. Drop a piece of protective fabric over your lace and give it a quick press with the iron to finish. And that’s all there is to it.

You can imagine all the creative things you can do with FSL
I’ve also created two more pieces over here to make long piece of lace.

Free-standing lace is a great technique for any machine in burger because of how simple it is and how beautiful the results.
SEE ALSO: How to join FSL embroidery pieces


Thank you for the invaluable tips. I double layered just as you suggested for my first try at FSL and it turned out beautifully. I am sure it saved me many trials with bad results! And as we all know, time and supplies are money.