")
Photo Stitch is a very beautiful and interesting design technique, created with the PE-design program. The process of such embroidery is similar to the work of an artist applying color strokes to a canvas and mixing tones.
Machine embroidery designs in this technique are characterized by a high density of finished embroidery.
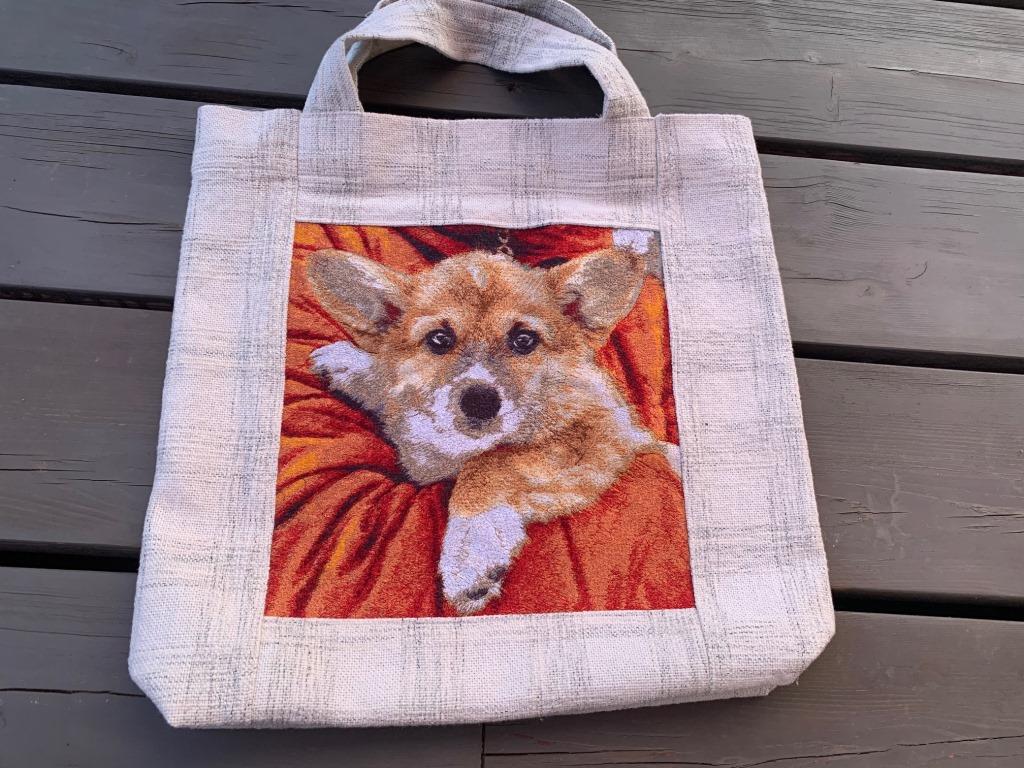
Due to the high density, Photo Stitch technique designs are not embroidered on T-shirts. But you can create very realistic portraits, paintings, patches, bags, etc.
Machine embroidery designs in the technique often have large embroidery fields (width and height) because in small size designs the Photo Stitch is of poor quality. To embroider them at home, they are divided into parts.

I will show you how to embroider my Photo Stitch designs divided into parts.
YOU NEED
For embroidery you will need:
– a base fabric. It is better to choose a natural structure for the base fabric in order to remove the possible roughness of the finished embroidery with an iron. It is not necessary to choose a white fabric, it can be any neutral color.
– threads. A large number of necessary colors of threads, often close to each other in shade, can make the process of their selection a responsible and difficult task. Good designers always include lists with the names of colors or their numbers in one palette or another. Focus on them in your choice, choosing from the threads you have.

Threads are best picked up in daylight. Take your time, even if the selection of flowers takes much longer. Remember that poorly chosen colors can spoil any, even the best photo stitch design!

-stabilizer. The high density of the pattern dictates the need to stabilize the embroidery very well.
Stabilizers can be very different – a tear-away embroidery stabilizer, sewing dublirin, and even printer paper. The main thing is that the stabilization is really good, as the density of embroidery in the Photo Stitch technique is very high. I use a tear-away stabilizer.
So, Photostitch design in your embroidery machine, a fabric with the stabilizer are in the embroidery hoops.

HOW TO EMBROIDERY
If the design consists of several parts, always embroider them in the order indicated!
Embroidery part #1 as usual.
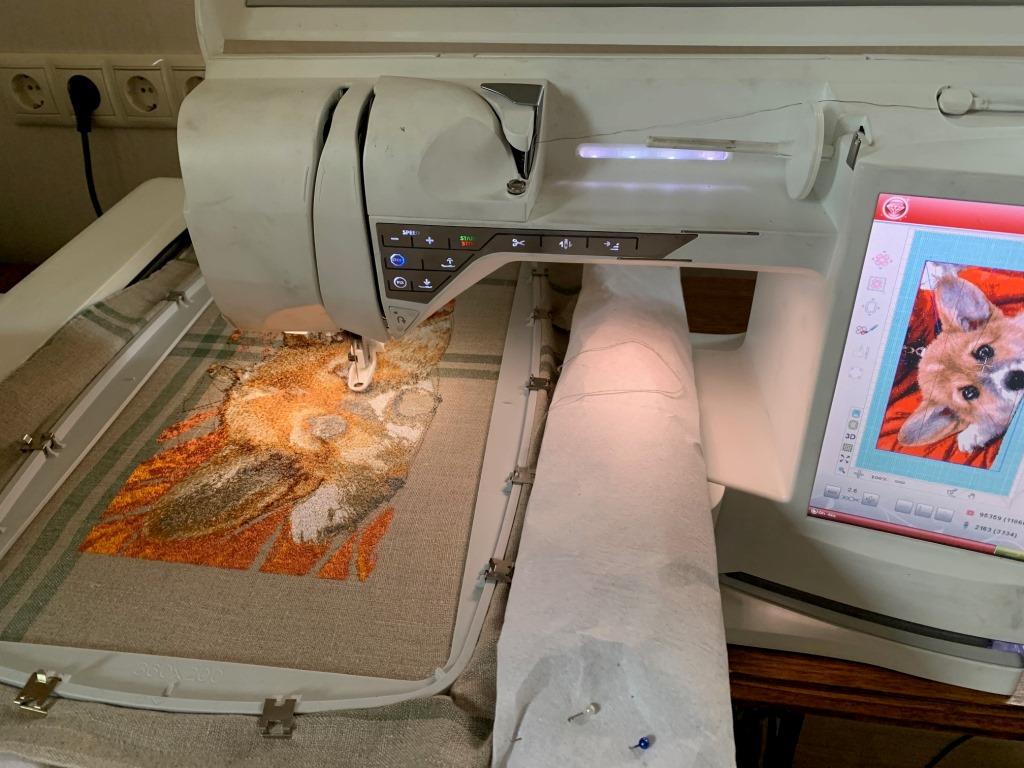
The connecting line is embroidered last, in my designs it is drawn in bright blue color. But you should not use bright threads for sewing it, so that they do not look through further embroidery.
After the first embroidery part is finished, draw marks on the sides of the hoop with a pencil or water-soluble marker. We do this to indicate the height of the embroidered design for the convenience of hooping the second part of the fabric.

Unhoop the fabric, remove the excess stabilizer, iron the product.

On the wrong side of the embroidery, it is not necessary to trim the jump stitches, but you can do this with special scissors if you want.

Move and hoop the fabric to embroider the second part along the marks.

Embroidering the second part begins with a connecting line, which must exactly match the such line of the first part.

If it does not match, move the design to the right/left or up/down using the buttons on the embroidery machine until it is OK.


If you are unsure if your fabric is well stabilized, you can move the line 1-2 mm further to the left (closer to the first part).


Embroidery part #2 according to the thread color chart.

Unhoop the fabric, remove the excess stabilizer, iron the product. The last photo is the finished embroidery. I used it to sew a bag for my sister who is a corgi mom